Adding a package to your private WinGet.RestSource feed using its API

I’ll show how to add a package to a private (WinGet.RestSource) feed – directly via its REST API because the WinGet client doesn’t support this (yet), and how to use this feed from WinGet.
Introduction
Microsoft has recently released Windows Package Manager 1.0, which automates the process of getting software on your machine. From the commandline, you specify which apps you want installed, and it does the work of finding the latest version (or the exact one you specified) and installing it on your machine. The WinGet client by default uses the Microsoft Community Repository in the form of a Git repo as its feed. New software is added almost daily, and so is an incredible source for publicly available software.
On the other hand, not all the software your company uses may be free; you might use commercial versions of software that cannot simply be downloaded from the internet, or you might use in-house built software that shouldn’t be available to the rest of the world. Or you might want to provide a repackaged version of a particular application or tool, preconfigured just right for use in your corporate environment. In these cases, it makes sense to create your own private WinGet package feed to add this kind of software to (rather than adding your paid/proprietary built software to the Microsoft Community Repository, exposed to all).
Luckily you can, since microsoft has released a reference implementation of a package feed based on a REST API called WinGet.RestSource and which is meant to be hosted in Azure. See my previous blogpost on how to get it up and running quickly.
Disclaimer: At the moment of writing this, the Windows Package Manager v1.0 has only been released for just over a month (I’m using v1.0.11451) and a lot of stuff is still in flux. This means that some things don’t quite yet work like they should (e.g.: the WinGet client doesn’t run on Windows Server 2019 without a hack), and a lot of the details I’m mentioning below may change when newer versions of WinGet are released. In fact, once Microsoft adds functionality to the WinGet client to push packages to a REST feed, most of this information won’t be that useful anymore.
However, if you don’t want to wait for that to start using WinGet with a private feed, then read on.
Working with WinGet.RestSource
Since the WinGet client at this moment doesn’t support adding packages, we’ll have to invoke WinGet.RestSource’s REST API directly to accomplish this. It’s important to note that, although both the Microsoft Community Repository and the WinGet.RestSource serve the same purpose, they differ in how they work. The obvious difference is that the manifest files used in the Microsoft Community Repository are YAML-based (see the schema they adhere to here), whereas WinGet.RestSource expects and emits JSON (see its service description here). Fortunately, its easy to convert from YAML to JSON, and after that, the .yaml manifest files line up almost (but not quite!) 1:1 to WinGet.RestSource’s REST resources.
So rather than creating a JSON package manifest by hand, I figured it’s more useful to show you how to convert an existing .yaml manifest (either from the Microsoft Community Repository or created by the Manifest Creator, docs here) into the format required by WinGet.RestSource. In this case I’ll use Notepad++ 8.0 as an example.
I’ve downloaded the 3 .yaml files from there into a local folder (open each file from the above github link, click the “Raw” button and press Ctrl+S to save it) so I can use them from Powershell.
As a prerequisite, I assume you have your instance of WinGet.RestSource running (see Hosting your own WinGet private repository on how to do this).
Open up your Azure Function App and look up the following:
- The REST endpoint base url: Open the Functions blade, click on the InformationGet function and click the “Get Function Url” button – the part before “
/information?” is your endpoint base url. - The host key: Open the App keys blade and copy the default host key (or generate a new one and use that), we’ll need it when modifying data (authorization keys are explained here).
Setting up the powershell basics
We’ll use Powershell to perform the conversion and do the REST service calls. We begin by defining variables for the endpoint base url and host key values we just found (so paste in your own!):
$endpointBaseUrl = "https://acme87azurefunction.azurewebsites.net/api/"
$hostKey = "Ho6omxS...R711ag=="
$headers = @{ "x-functions-key" = $hostKey }
With this, we should be able to query the /information endpoint, and it should report back the ServerIdentifier we configured for the Azure Function App:
Invoke-RestMethod -Uri "$endpointBaseUrl/information"

# Response should be:
# Data
# ----
# @{SourceIdentifier=My private feed; ServerSupportedVersions=System.Object[]}
To be able to work with .yaml files, we’ll download the powershell-yaml module, and use it to parse Notepad++’s 3 .yaml files we downloaded earlier:
Install-Module -Name powershell-yaml

$main = Get-Content "Notepad++.Notepad++.yaml" -Encoding UTF8 | ConvertFrom-Yaml -Ordered
$localeEnglish = Get-Content "Notepad++.Notepad++.locale.en-US.yaml" -Encoding UTF8 | ConvertFrom-Yaml -Ordered
$installer = Get-Content "Notepad++.Notepad++.installer.yaml" -Encoding UTF8 | ConvertFrom-Yaml -Ordered
Adding to the /packages resource
The first thing we need to do is to add an entry to the /packages resource; for this we can simply convert the $main data to JSON and POST it. Note that we need to specify the x-functions-key HTTP header containing the host key, otherwise we won’t be authorized to perform this operation.
$main | ConvertTo-Json -Depth 10 | Out-File "package.json" -Encoding utf8
Invoke-RestMethod -Uri "$endpointBaseUrl/packages" -Method Post -Headers $headers -InFile "package.json"

# Response should be:
# Data
# ----
# @{PackageIdentifier=Notepad++.Notepad++}
Note that the in-between step of writing the JSON fragment to a file isn’t strictly necessary, but I find it easier to troubleshoot this way, as it allows me to tweak the JSON file before POSTing it.
Adding to the /versions resource
Next, we’ll need to add the version of Notepad++. As you may have noticed, there is no corresponding “…version.yaml” file included in the original manifest. This is easy to solve however, because all we need is 2 properties, one with the PackageVersion, and one with all the details of the default locale (i.e. not just “en-US“).
And right here, we immediately run into another difference: Unlike in the .yaml files, the locale’s Tags element is not allowed to contain any elements with spaces in it, so the tag “text editor” is not valid here, and would result in the error message “Tags in Microsoft.WinGet.RestSource.Models.Arrays.Tags must match validation pattern: ‘^\S+$’.”“.
# Format difference: Tags are not allowed to have spaces in them.
$localeEnglish.Tags = $localeEnglish.Tags | ForEach-Object { $_ -replace ' ', '' }

$version = [PSCustomObject] @{ PackageVersion = $main.PackageVersion; DefaultLocale = $localeEnglish }
$version | ConvertTo-Json -Depth 10 | Out-File "version.json" -Encoding utf8

Invoke-RestMethod -Uri "$endpointBaseUrl/packages/$($main.PackageIdentifier)/versions" -Method Post -Headers $headers -InFile "version.json"
Adding to the /locales resource
With the package identifier and versions added, now we can add the locales supported by this package. In the case of Notepad++ there’s only one, but if there were more, each one should be added to the /locales collection.
# Format difference: The Publisher and PackageName properties are required.
$localeEnglish | ConvertTo-Json -Depth 10 | Out-File "locale.en-US.json" -Encoding utf8
Invoke-RestMethod -Uri "$endpointBaseUrl/packages/$($main.PackageIdentifier)/versions/$($main.PackageVersion)/locales" -Method Post -Headers $headers -InFile "locale.en-US.json"
Adding to the /installers resource
Finally, we need to add the installers that are available. And this is maybe the biggest difference; whereas there only exists a single …installer.yaml file that contains an Installers array that describes the various installers, each Installers entry needs to be added seperately to the /installers resource, with the other properties from the …installer.yaml file (such as FileExtensions and InstallModes) added to it.
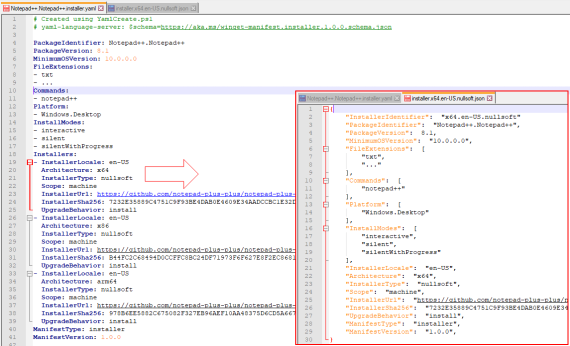
Also, because we’re adding multiple resources, each /installers resource needs a unique InstallerIdentifier property by which it can be identified. This property is not included in the original …installer.yaml file, so we’ll have to generate one ourselves.
# Add the installers. These need to be flattened, so take the Installers array as the base elements...
$installers = $installer.Installers
foreach($elt in $installers)
{
   #...and to each element, add all properties of the root Installer object (except for the Installers collection itself, of course).
   $installer.GetEnumerator() | Where-Object { $_.Key -ne "Installers" } | ForEach-Object { $elt.Add($_.Key, $_.Value) }

   # Format difference: Each installer needs a unique "InstallerIdentifier" property, so compose one like "x64.en-US.nullsoft"
   $installerIdentifier = "$($elt.Architecture).$($elt.InstallerLocale).$($elt.InstallerType)"
   $elt["InstallerIdentifier"] = $installerIdentifier

   # Add it to the /installers collection
   $elt | ConvertTo-Json -Depth 10 | Out-File "installer.$installerIdentifier.json" -Encoding utf8
   Invoke-RestMethod -Uri "$endpointBaseUrl/packages/$($main.PackageIdentifier)/versions/$($main.PackageVersion)/installers" -Method Post -Headers $headers -InFile "installer.$installerIdentifier.json"
}
At this point, all the package data has been added, and the package can be installed from this source using WinGet. I’ll get to that in a minute, but first…
Backing up, altering, deleting and restoring manifests
The manifest data we added by POSTing to the different REST resources can also be manipulated as one big chunk via the /packageManifests resource.
$packageIdentifier = "Notepad++.Notepad++"

# Export the entire manifest (but leave out the top-level "Data" property)
$manifest = Invoke-RestMethod -Uri "$endpointBaseUrl/packageManifests/$packageIdentifier"
$manifest.Data | ConvertTo-Json -Depth 10 | Out-File "packageManifests.json" -Encoding utf8

# Update the manifest with the contents of the packageManifests.json file
Invoke-RestMethod -Uri "$endpointBaseUrl/packageManifests/$packageIdentifier" -Method Put -Headers $headers -InFile "packageManifests.json"

# Delete the manifest
Invoke-RestMethod -Uri "$endpointBaseUrl/packageManifests/$packageIdentifier" -Method Delete -Headers $headers

# Add a new manifest from a combined .json file:
Invoke-RestMethod -Uri "$endpointBaseUrl/packageManifests" -Method Post -Headers $headers -InFile "packageManifests.json"
Using the REST source from WinGet
To be able to use our private feed from WinGet, we first need to register it as a new source. Since this is a REST feed rather than a GitHub-backed repo, we have to explicitly specify its type as Microsoft.Rest
C:>winget source add --name Acme87Feed https://(yourfeedhere).azurewebsites.net/api/ -t Microsoft.Rest

Adding source:
  Acme87Feed -> https://acme87azurefunction.azurewebsites.net/api/
Done

C:>winget source list

Name                Argument
----------------------------------------------------------------------
Acme87Feed          https://acme87azurefunction.azurewebsites.net/api/
winget              https://winget.azureedge.net/cache
Once registered it can be used like any other feed; if you want to use just your private feed, specify the feed alias with the --source parameter. For example, to list the packages available from your feed:
C:>winget show --source Acme87Feed

Name       Id                    Bron
----------------------------------------------------
Notepad++  Notepad++.Notepad++   Acme87Feed
To perform the actual installation:
C:>winget install Notepad++ --source Acme87Feed

Found Notepad++ [Notepad++.Notepad++]
This application is licensed to you by its owner.
Microsoft is not responsible for, nor does it grant any licenses to, third-party packages.
Downloading https://github.com/notepad-plus-plus/notepad-plus-plus/releases/download/v8.1/npp.8.1.Installer.x64.exe
  .............................. 4.04 MB / 4.04 MB
Successfully verified installer hash
Starting package install...
Congratulations, you’ve installed your first package from your own private feed 🙂