Continuous delivery with Jenkins and Docker

After the previous article Deploying Java applications with Docker I decided to integrate Docker and Jenkins as a continuous delivery platform. Of course there are other ways to achieve this with Puppet, Chef, Vagrant, Nolio and many other tools. Those tools have one thing in common: they are new to most developers and operations. Of course developers and operations are quite smart and they are able to learn new tools. But why would we invest in those new tools, while there are tools available that a lot of developers and operations are already familiar with. Jenkins is used in most organisations already and working with Docker is quite easy. Docker requires you to know some standard commands for instance to create and start a container. But configuring a Docker container is really easy as you can use standard operating system commands like apt-get, wget, mkdir etc. Compare that to the complete DSL’s/tools you have to learn for other solutions.
Another reason to use Jenkins and Docker instead of other solutions is the volatile market of ‘continuous delivery’ tools. A lot is going on in that market, Microsoft bought InRelease, Nolio was bought by CA Technologies. Then you have Puppet and Chef, both providing more or less the same solution. You could invest time and maybe even money in those solutions, but what if they loose the competition? You might end up with a continuous delivery platform that was quite expensive (in man hours and maybe even in real money) that is no longer supported. That’s another reason for me to pick components that are free and already used or quite simple to use. Choosing this direction will probably mean that we can build a continuous delivery platform faster and cheaper.
What are we trying to solve?
It is quite common for our customers to use a DTAP environment to deploy applications. DTAP stands for Development, Test, Acceptance and Production. Deploying an applications that is not working correct in development is not such an issue. Deploying the same application in production is of course quite an issue. So it is a good idea to build a deployment pipeline to prevent an application to reach production if it has some issues. A common deployment pipeline starts with compilation and unit testing. After that a lot is possible, maybe integration testing, or deployment to development where automated functional testing will take place. This article focuses on the integration between Jenkins and Docker. The various checks are left out of this article, but who knows, maybe I will include them in another article.
Docker containers
For the DTAP environment four containers are created. Each of the containers includes something specific for that environment: a file indicating the environment. All DTAP containers extend from a common base (AppServerBase) that includes Ubuntu, JDK, Tomcat and the sample application. The Dockerfiles and the other files used in this article are shown below.
AppServerBase Docker file
#AppServerBase
FROM ubuntu:saucy
# Update Ubuntu
RUN apt-get update && apt-get -y upgrade
# Add oracle java 7 repository
RUN apt-get -y install software-properties-common
RUN add-apt-repository ppa:webupd8team/java
RUN apt-get -y update
# Accept the Oracle Java license
RUN echo "oracle-java7-installer shared/accepted-oracle-license-v1-1 boolean true" | debconf-set-selections
# Install Oracle Java
RUN apt-get -y install oracle-java7-installer
# Install tomcat
RUN apt-get -y install tomcat7
RUN echo "JAVA_HOME=/usr/lib/jvm/java-7-oracle" >> /etc/default/tomcat7
EXPOSE 8080
RUN wget http://tomcat.apache.org/tomcat-7.0-doc/appdev/sample/sample.war -P /var/lib/tomcat7/webapps
# Start Tomcat, after starting Tomcat the container will stop. So use a 'trick' to keep it running.
CMD service tomcat7 start && tail -f /var/lib/tomcat7/logs/catalina.out
Environment D Dockerfile
# Environment D
FROM AppServerBase
RUN mkdir /var/lib/tomcat7/webapps/environment
RUN echo 'Development environment' >> /var/lib/tomcat7/webapps/environment/index.html
ENVIRONMENT T DOCKERFILE
# Environment T
FROM AppServerBase
RUN mkdir /var/lib/tomcat7/webapps/environment
RUN echo 'Test environment' >> /var/lib/tomcat7/webapps/environment/index.html
ENVIRONMENT A DOCKERFILE
# Environment A
FROM AppServerBase
RUN mkdir /var/lib/tomcat7/webapps/environment
RUN echo 'Acceptance environment' >> /var/lib/tomcat7/webapps/environment/index.html
ENVIRONMENT P DOCKERFILE
# Environment P
FROM AppServerBase
RUN mkdir /var/lib/tomcat7/webapps/environment
RUN echo 'Production environment' >> /var/lib/tomcat7/webapps/environment/index.html
removeContainers.sh file
This file is used to stop and remove all containers and to remove all images. This is used for testing purposes, to see if everything is working correct. For normal usage, this is not the best solution as all Docker resources (Ubuntu image etc.) are removed. These resources are downloaded again when the containers are build.
docker stop $(docker ps -a -q)
docker rm $(docker ps -a -q)
docker images | xargs docker rmi
script.sh file
This file is used for testing. Executing this file will remove all Docker containers and images. After that it will create AppServerBase and the DTAP containers. At the end the DTAP containers will be started.
sh removeContainers.sh
cd AppServerBase
docker build -t AppServerBase .
cd ../EnvironmentD
docker build -t EnvironmentD .
cd ../EnvironmentT
docker build -t EnvironmentT .
cd ../EnvironmentA
docker build -t EnvironmentA .
cd ../EnvironmentP
docker build -t EnvironmentP .
docker run -p 8081:8080 -d EnvironmentD
docker run -p 8082:8080 -d EnvironmentT
docker run -p 8083:8080 -d EnvironmentA
docker run -p 8084:8080 -d EnvironmentP
Diskspace
As already mentioned in the previous article, Docker’s diskspace consumption can be made quite efficient. The ‘docker images -tree’ command shows a Ubuntu Saucy image is created. On the Ubuntu image the sofware is installed (JDK, Tomcat, sample application). This results in the AppServerBase image which is 759.7 MB. The EnvironmentD, EnvironmentT, EnvironmentA and EnvironmentP images extend from AppServerBase and consume less than 1 MB of diskspace. That means we have four containers for the DTAP environment for less than 800 MB of diskspace. Try to achieve that with virtual machines!
$ docker images -tree
 ??511136ea3c5a Virtual Size: 0 B
 ??1c7f181e78b9 Virtual Size: 0 B
 ??9f676bd305a4 Virtual Size: 178 MB Tags: ubuntu:saucy
 ??901b132b48ed Virtual Size: 261.7 MB
 ??5f10b7c4394d Virtual Size: 295 MB
 ??a88634ac8a6b Virtual Size: 295 MB
 ??17625195a901 Virtual Size: 295.2 MB
 ??baf37281acb1 Virtual Size: 298 MB
 ??f98e98629ec4 Virtual Size: 748.3 MB
 ??abc089686d46 Virtual Size: 759.7 MB
 ??dfa5aff23263 Virtual Size: 759.7 MB
 ??cbd70b9df729 Virtual Size: 759.7 MB
 ??e569c2992211 Virtual Size: 759.7 MB
 ??235cdc7fe3d9 Virtual Size: 759.7 MB Tags: AppServerBase:latest
 ??f95c80d23c9d Virtual Size: 759.7 MB
 ??1d132acd0c0c Virtual Size: 759.7 MB Tags: EnvironmentP:latest
 ??b160e3fc263c Virtual Size: 759.7 MB Tags: EnvironmentD:latest
 ??ae7d80546bab Virtual Size: 759.7 MB Tags: EnvironmentA:latest
 ??ab72a476b7c7 Virtual Size: 759.7 MB Tags: EnvironmentT:latest
Testing DTAP environment
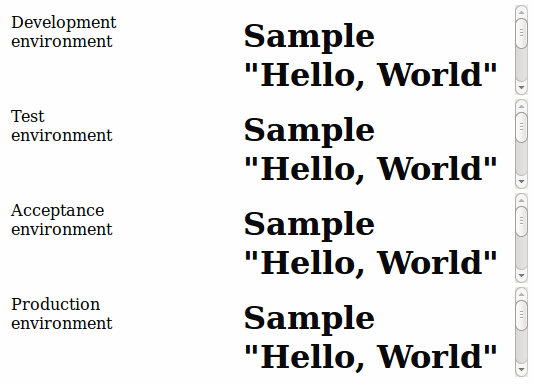
To see if the containers are working a small html file was created. The HTML file shows the environment specific information, which indicates the environment. Besides the environment the HTML file shows the running application. The content of the HTML file is shown below together with the resulting webpage. In the webpage it is clearly visible that all containers/applications are running.
<html>
<head>
<title>Docker container overview</title>
</head>
<body>
<object type="text/html" width="120" height="90" data="http://localhost:8081/environment/index.html"></object>
<object type="text/html" width="400" height="90" data="http://localhost:8081/sample/index.html"></object>
<br/>
<object type="text/html" width="120" height="90" data="http://localhost:8082/environment/index.html"></object>
<object type="text/html" width="400" height="90" data="http://localhost:8082/sample/index.html"></object>
<br/>
<object type="text/html" width="120" height="90" data="http://localhost:8083/environment/index.html"></object>
<object type="text/html" width="400" height="90" data="http://localhost:8083/sample/index.html"></object>
<br/>
<object type="text/html" width="120" height="90" data="http://localhost:8084/environment/index.html"></object>
<object type="text/html" width="400" height="90" data="http://localhost:8084/sample/index.html"></object>
</body>
</html>
Jenkins integration
Of course the script is working quite easy, but this scenario is not commonly used. Most companies and organisations don’t want applications to end up in production automatically, they want someone to push the button before that happens. More importantly they want the application to be tested thoroughly before ending up in production. Another important aspect is auditing information, with these scripts it is hard to know when which application was deployed to what environment. The rest of this article will show how Jenkins can be used to achieve those goals. Testing the application on code quality, functionality, performance etc. is easy with Jenkins, but is left out of this article as explained before.
First make sure you have Jenkins up and running and install the Build Pipeline Plugin. Do not confuse this plugin with the Delivery Pipeline Plugin which also looks nice, but is not used in this article.
Create Jenkins Jobs
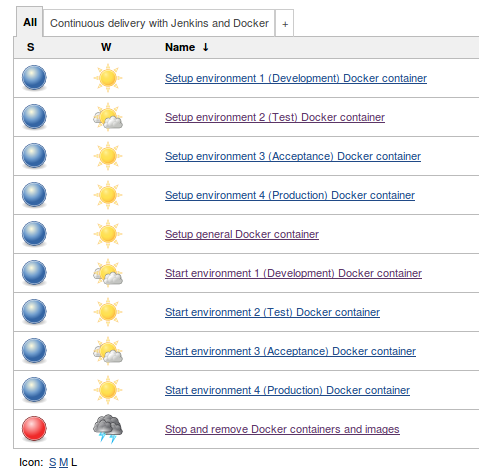
Create the jobs shown in the image below and use the commands from the script.sh file that was included earlier. The jobs should be connected to each other, so make sure to trigger the other jobs in the post build step.
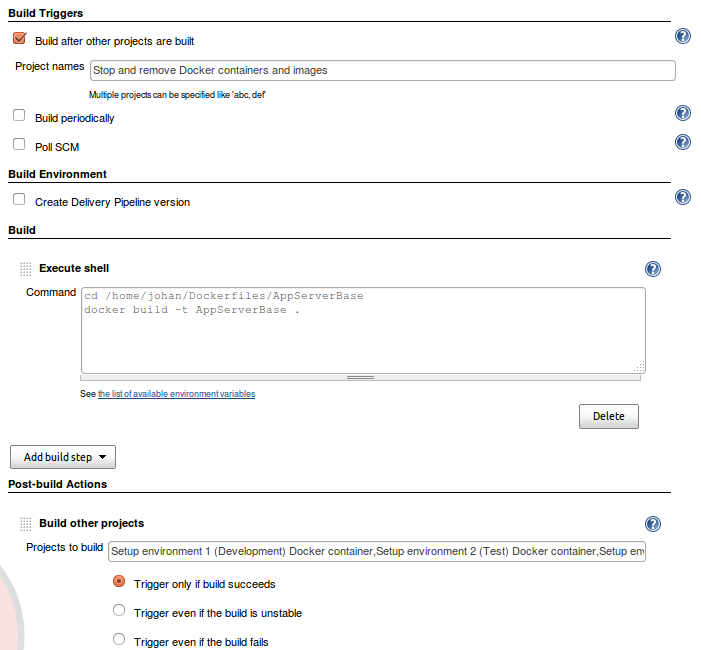
The image below shows the ‘Setup general Docker container’ job. This job is executed after the ‘Stop and remove Docker containers and images’ job. In the ‘Setup general Docker container’ job the AppServerBase is created with the build step ‘Execute shell’. After this job the setup enviroment jobs for DTAP are started automatically.
The image below shows the ‘Setup environment 4 (Production) Docker container’ job. This job has another post-build action named ‘Build other projects (manual step)’. Using this kind of action means that the ‘ Start environment 4 (Production) Docker container’ job is not started automatically. A user has to start the ‘Start environment 4 (Production) Docker container’ job explicitly.
After creating these jobs it is already possible to use the functionality and start deploying. But you probably already noticed the view is not so nice and organised with lots of different jobs. The Jenkins Build Pipeline Plugin will fix this.
Jenkins Build Pipeline Plugin
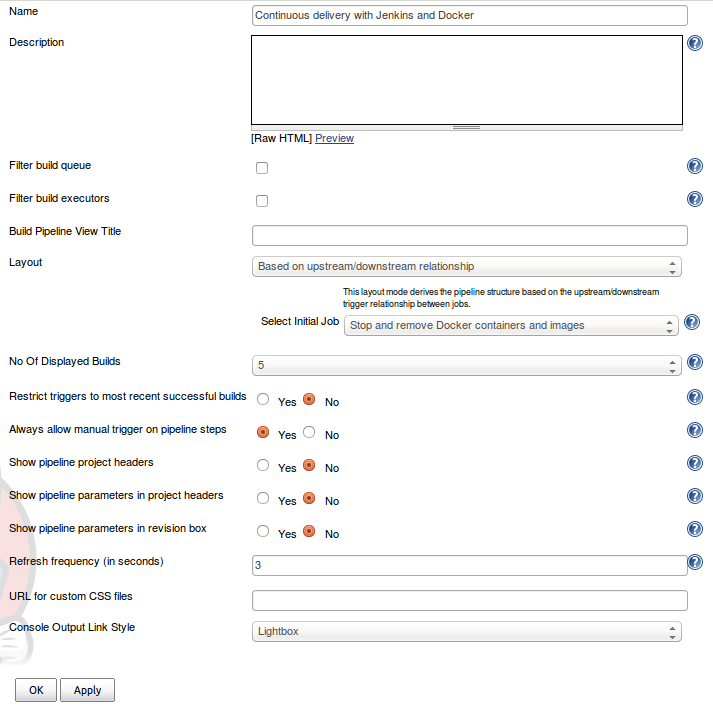
Create a new view and choose ‘Build Pipeline View’, then configure the view. The configuration used for this article is shown below. The most important part is picking the initial job.
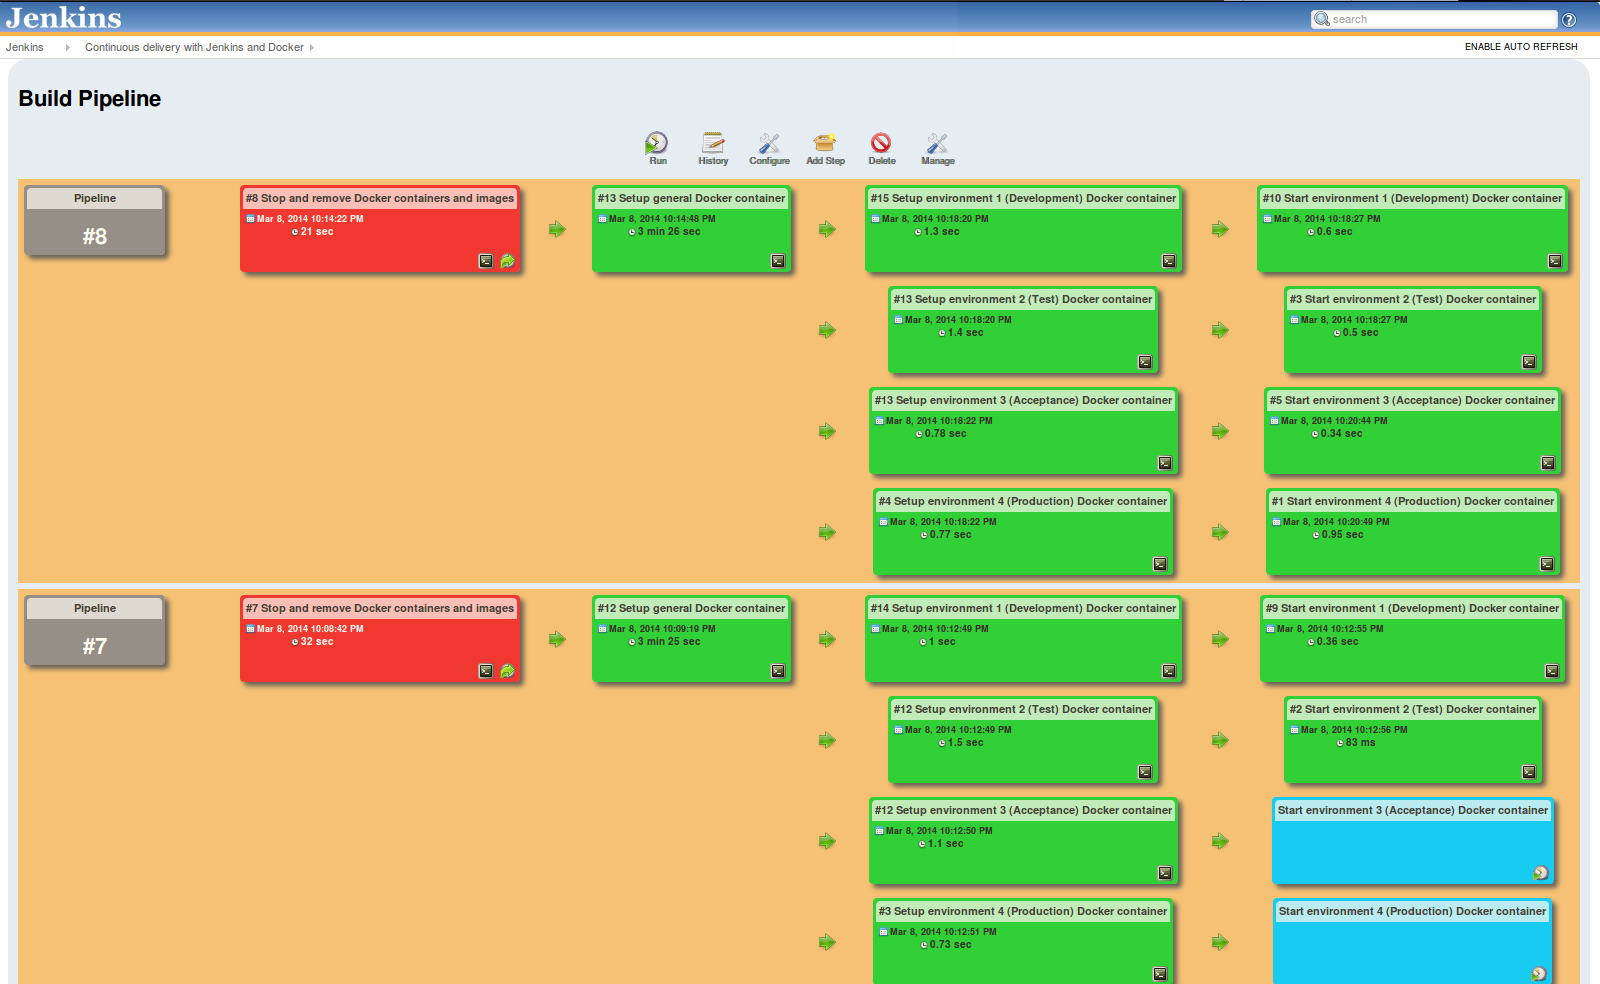
After configuring the plugin, start using it by hitting the ‘Run’ button. The image below (click the image to see the details) shows that the pipeline is already executed eight times. Run seven and eight are shown in the image. The blue boxes in run seven indicate that the job should be executed manually. The jobs are configured so that starting acceptance and production should be executed manually. Starting those jobs is easy, just click the play icon in the job. Pipeline eight shows the end result after all automatic and manual jobs are executed. The green boxes show that the job was executed successful, while the red boxes indicate that the job has failed. The remove job has failed, but all containers and images where removed. The job failed because some containers could not be found, but that was not an issue for this setup.
The image above shows that some jobs are executed sequentially, while others like the setup environment jobs are executed in parallel. When constructing a pipeline you should try to define as much jobs in parallel as possible to reduce the execution time.
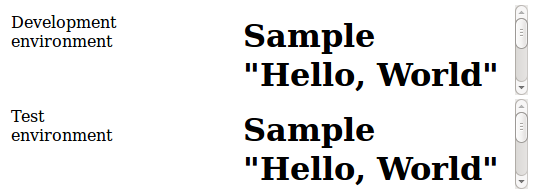
The corresponding webpage for pipeline eight was:
The corresponding webpage for step seven was:
Speed
Creating this deployment pipeline was quite easy as I was already familiar with Jenkins. So within a short amount of time the complete solution was created and the application could be deployed. Also the execution of the Jenkins jobs is completed within seconds or less. The only slower jobs are the removal of the docker containers and images and the creation of the base image. That is mainly due to my testing setup, this setup throws away all containers and images information and needs to download the resources again. So the ‘Setup general Docker container’ needs to download a Ubuntu image, JDK, Tomcat and install everything. That’s still achieved in less than four minutes with a 20 Mbit/s internet connection.
The script was later adjusted so the containers are only stopped, the containers and images are no longer removed. This resulted in the pipeline below which shows that the complete pipeline is executed within 30 seconds. This Docker solution is remarkably quick and quite a competitor for the traditional virtual machines.
Next steps
Of course, this is a quick way to show the integration between Jenkins and Docker, but the scenario is far from realistic. In a real environment one would use a complete build environment using tools like Sonar, Nexus, Git and lots of testing tools like Fitnesse, Selenium, JMeter etc. Those tools should be integrated in the deployment pipeline to ensure only software that meets the standards is deployed to production. Those tools should of course run in Docker containers!
