Hosting your own WinGet private repository

Together with the release of Windows Package Manager 1.0, Microsoft has also released a reference implementation of the REST API source so it’s possible to host your own private repository, and I wanted to give it a spin. This repo can be cloned from here; because it’s an Azure solution, next to Visual Studio 2019 you also need an Azure subscription.
When trying to get this to work, with the version I cloned (from Jun 20th 2021) I ran into a couple of caveats and some mistakes on my part which I think is useful to mention here.
1. Building the WinGet.RestSource solution
To build the WinGet.RestSource solution:
-
- Make sure you’re using Visual Studio 2019 with the latest updates (currently 16.10) installed, and with the proper .NET SDK’s.
- The
srcNuGet.configresets the package source to a source which I couldn’t access. Since all the packages used are also available from NuGet.org, I removed the <clear> and <add> elements from this file to use the default NuGet.org feed again:
<packageSources>
  <clear />
  <add key="winget" value="https://pkgs.dev.azure.com/ms/winget-cli-restsource/_packaging/winget/nuget/v3/index.json" />
</packageSources>
2. Deploying the Infrastructure templates
- To be able to deploy any of the Templates in the WinGet.RestSource.Infrastructure project, there should be a
Deploy-AzureResourceGroup.ps1script in the project’s root, but which was (in my version of the repo) not present (when right-clicking this project and choosing “Deploy/New..”, it will complain about “PowerShell deployment script is missing in project.”).
Since this script is ususally the same for infrastructure deployment projects, the easiest way is to temporarily add a new Azure Resource Group project to the solution (the Blank template is enough) to which Visual Studio will add a newDeploy-AzureResourceGroup.ps1script. You can then copy this script to the WinGet.RestSource.Infrastructure project and delete the Azure Resource Group project again.
At this point, choosing “Deploy/New..” on the Infrastructure project should work now and open the “Deploy to Resource Group” dialog.
If you’re new to Azure infrastructure projects, its good to know that each template contains a Deployment template (e.g. keyvault.json) and a Template parameters (e.g. keyvault-sample.json) file, and that you need both to deploy a particular template. Most of the time, when choosing a Deployment template Visual Studio automatically selects the corresponding parameters file, but not always.
In order for the application to work, all Templates (except for FrontDoor?) need to be deployed (preferrably into the same resource group). Since some of the projects reference eachother you need to deploy them in order “from the ground up”. I used the following sequence:
2.1. KeyVault
- Note that the
keyvault.samplefile (in my version of the repo) wasn’t recognised because it’s$schemavalue is that of adeploymentTemplate; if that is the case, change it to adeploymentParametersschema by copying its $schema value from one of the other .sample files. - The
keyvault.samplefile has anaccessPolicieselement with tenantIds and objectIds from someone else, I removed these so that its value is an empty array ("value": [ ]). - From the “Deploy to Resource group” dialog, when clicking “Edit parameters” you still need to specify the name; for this example I use Acme87KeyVault.
2.2. StorageAccount
- The storageAccountName can only contain lowercase letters and digits, for this example I use acme87storage.
- I removed the
locationelement from thestorageaccount.sample.westus.jsonfile, so that it defaults to the location of the resource group.
2.3. AppServicePlan
- As the aspName I used Acme87ServicePlan.
- Again I removed the
locationelement from theasp.sample.westus.jsonfile.
2.4. ApplicationInsights
- For the name I used Acme87AppInsights.
2.5. CosmosDB
a. cosmosdb.json
- When executing this template as-is, the Powershell windows will prompt “Supply values for the following parameters: nameFromTemplate”; this is an issue that is explained here. If you want to be thourough, you can rename the parameter from “name” to e.g. “cosmosName” (it occurs 2x in
cosmosdb.jsonand 1x incosmosdb-sample.json), but simply entering the name of the database here works fine as well. Note that the name, again, can only contain lowercase letters and digits, for this example I use acme87cosmos.
b. cosmosdb-sql.json
- For the cosmosName parameter, I specify the name I gave to the CosmosDB, in this case “acme87cosmos”.
c. cosmosdb-sql-container.json
- Same thing, specify the CosmosDB name, so “acme87cosmos”.
2.6. AzureFunction
This is the last template and the one that ties everything together. Note that deploying it will not succeed until we’ve added a KeyVault secret!
- Again I removed the “location” element from the azurefunction.sample.westus.json file so that it uses the location of the resource group.
- As the functionName, I use the name Acme87AzureFunction
- The serverIdentifier is the information that WinGet clients get when they connect to this server, and can be anything you want, such as “My private feed”.
- For the following 3 parameters, specify the names we gave to each component:
- appServiceName: Acme87ServicePlan
- keyVaultName: Acme87KeyVault
- appInsightName: Acme87AppInsights
- Finally, for storageSecretName we specify the name of a secret that we’ll be adding to the KeyVault next: Acme87StorageConnectionString.
Again, we cannot succesfully deploy this AzureFunction template until we’ve added this secret to the KeyVault, so lets do that first.
- In Azure, open the Acme87KeyVault and navigate to Secrets, it will tell you that “The operation “List” is not enabled in this key vault’s access policy.”
- So we navigate to Access policies, click on Add access policy, choose the Secret management template and as Principal, select your own user account. Click Add, and don’t forget to click Save on the Access policies page.
- Navigate to Secrets again, this time it will tell you “There are no secrets available.”, which means we can add them.
- Click “Generate/Import” to create a new Secret and name it Acme87StorageConnectionString.
- For the value: open a new browser tab and navigate to the acme87storage storage account, navigate to Access keys, click Show keys and copy the key1 *Connection string*. Paste this as the Secret’s value. Leave the other fields as-is and click “Create”.
Now we can deploy the AzureFunction template.
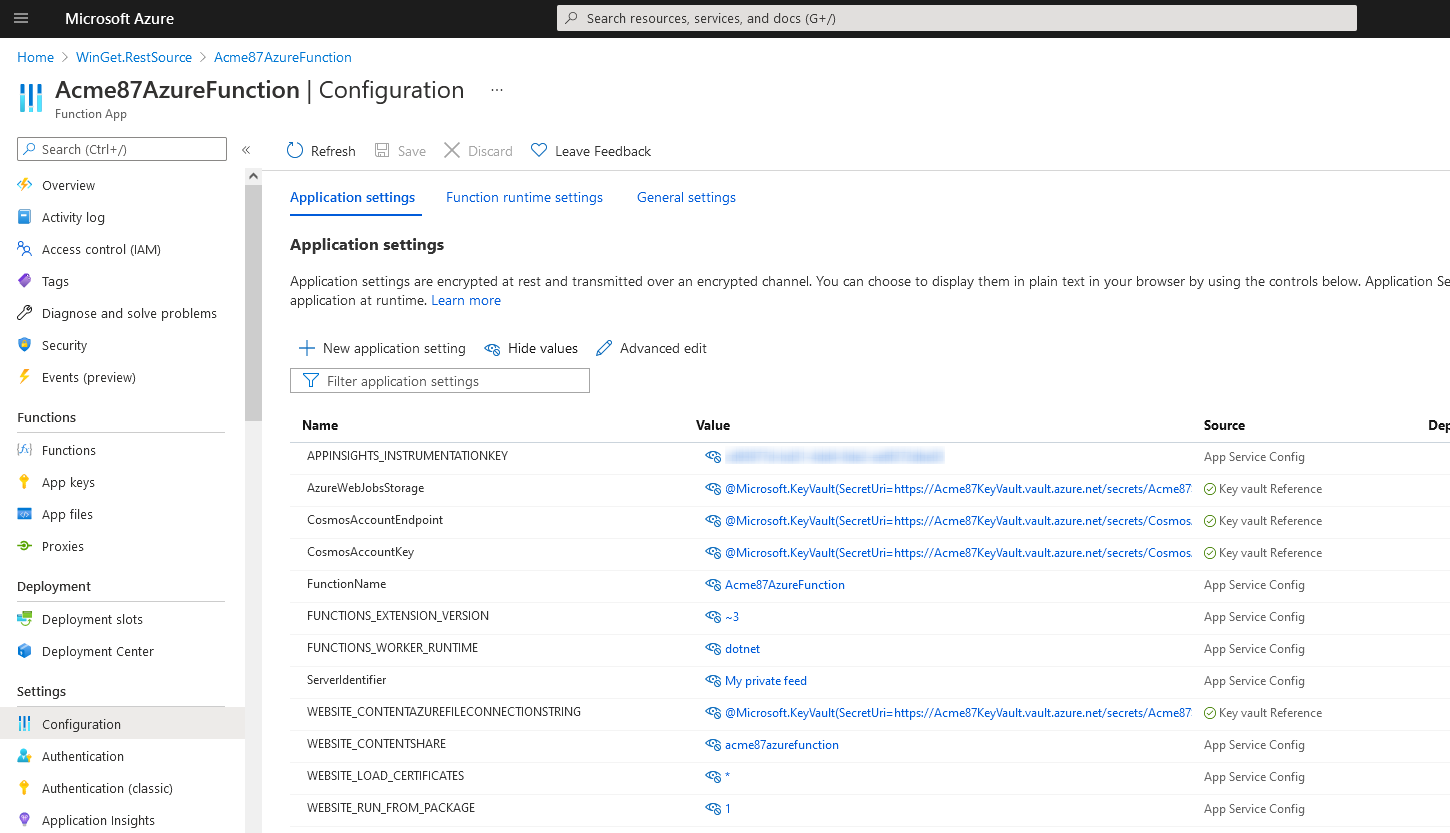
3. Configuring the Function App
Once this is done,
- in Azure navigate to the Acme87AzureFunction, select Configuration to display the Application settings and click “Show values”. It will show 4 Key Vault reference values, of which 2 marked with a red ‘X’ – so these still need to be created.
- So navigate to Acme87KeyVault’s Secrets, and add the following keys, with their values taken from the acme87cosmos Keys page:
- CosmosAccountKey: The PRIMARY KEY value (a Base64 string)
- CosmosAccountEndpoint The URI value (in the case of this example
https://acme87cosmos.documents.azure.com:443/), NOT one of the connection strings.
- Now navigate back to the Acme87AzureFunction’s Configuration and show the Application settings values, all Key Vault references should now be marked green (you might need to hit the Refresh button first) and the Function App should now be configured correctly.
At this point Acme87AzureFunction’s Functions tab will show “No results.”, which makes sense because we haven’t deployed the WinGet.RestSource.Functions project. Lets do that next.
4. Publishing the Functions project
From Visual Studio, rightclick on the WinGet.RestSource.Functions project and click “Publish…” In the Publish dialog:
- as Target select “Azure”
- and as Specific Target select “Azure Function App (Windows)”.
- On the “Functions instance” tab, for Function Apps, the “Acme87AzureFunction (App service plan)” should be displayed under WinGet.RestSource, select it and keep the “Run from package file” option checked.
- For Deployment type, select Publish.
- On the final page, click the Publish button. I didn’t get it working correctly until I changed back the Target framework (on the WinGet.RestSource.Functions project settings page) from .NET 5.0 to .NET Core 3.1, but YMMV.
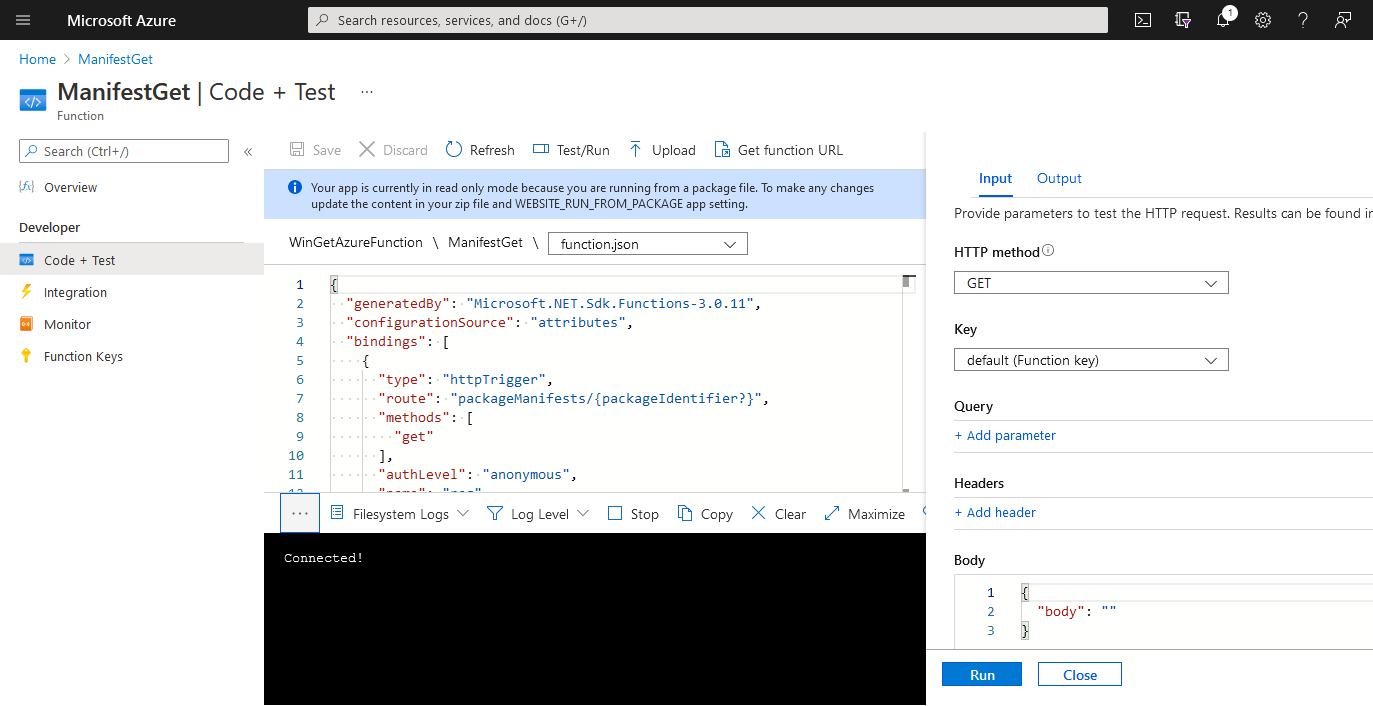
5. Testing the REST methods
In Azure, navigate to the Acme87AzureFunction’s Functions tab, it should now show about 20 operations.
- Click on the ManifestGet operation, and select the “Code + Test” tab and click the “Test/Run” button to open an Input/Output blade.
- Here, choose HTTP Method “Get”, Key “default (Function key)” and remove the packageIdentifier parameter.
- Click Run and wait for the result on the Output page (this may take a while), if all went well it should report a 204 No Content.
Congratulations, you now have your own private WinGet repository!
Using it from the WinGet client is another matter, and something for another time. Cheers 🙂